Working with documents at work, you can save a lot of time by learning to create Open Office templates. For example, if your daily work routine requires you to write letters to different people many times a day, then it would be wise to create Open Office template for letters. A template that automatically inserts date and time, contact information, and other data that you include in each letter. You can use the template to define a layout, fonts and other formatting rules for your letter.
Open Office templates are easy to create, organize and use. In this quick tutorial we try to learn how to create a template that adds a header and footer on every page. With header containing the document title and footer displaying the page number. We will also select different fonts for Heading1 and Text body of the document.
- Start Open Office Writer and then go to File > New > Documents and Templates.
- Select New Document > Text Document and press the Open button.This opens a new empty file which is a like a canvas where we are going to draw our template.
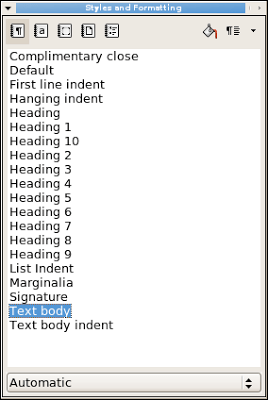
- Now we will change Style and Formatting. To open the Style and Formatting dialog box you can press Style and Formatting button or go to Format > Style and Formatting or simply press F11button on your keyboard. A dialog box appears that look like this:
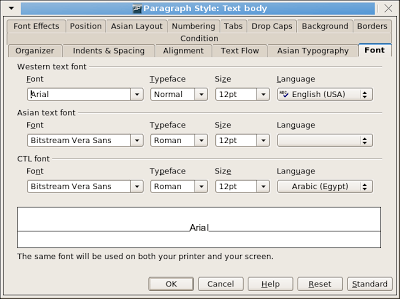
- This is the place where you set the formatting rules for different elements in your document. Select Text Body right click and then select modify. This opens a new dialog box that looks like this:
Here you can change the font. We want our normal text to appear in Arial so we change the font to Arial and then we press the Ok button.
- Now we return to the Styles and Formating dialog box. At the bottom there is a drop down combo box (See Figure 1) click on it and select All Styles. Doing this displays all the available styles that you can modify.
- Now we click on Header, right click and select Modify to change the formatting of how our header looks like. Then we repeat the process with Footer and Heading 1.
- Close the Styles and Formatting dialog box window and return to the empty Untitled document.
- Now go to Insert > Header and select Default. Then go to Insert > Footer and select Default. Doing this will add Header and Footer to your empty document’s pages.
- Now click on the header box and then go to Insert > Fields and select Title. Doing this automatically adds the Title of the Document in Header.
- Then click on the footer box that appears at the bottom of your empty page. Go to Insert > Fields and select Page Number. Doing this adds a page number on the footer of every page that uses this template.
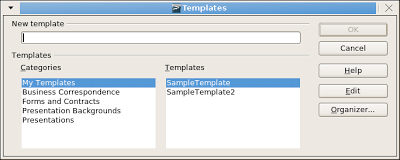
- Now we will save the template. Go to File > Templates and select Save. This opens a dialog box (See figure 3 below). Give a name to your template in the New Template feild we named our template SampleTemplate2 in this example . Select a category from the Categories list, we use My Templates in this example and press Okbutton.
- Now go to File > Close and a warning box would appear asking you to Save or Discard changes. Click on Discard changes. Don’t worry, your template is already saved.
Now we are going to learn how to use this template to create new documents.
- Go to File > New > Documents and Templates. Choose Templates tab in the Templates and Document dialog box that now appears before you. There you will see your template Categories. We saved our template in My Templates, so we double click My Templates. This shows templates in my templates category and our template SampleTemplate2 is there. Select it and press Open button.
- Go to File > Properties which opens a dialog box for your new untitled document. Click on Description tab and give your document a Title. You will notice that the title automatically appears in the Header feild. Scroll down and you will also notice the page number appearing at the bottom of the page.
This was just an introductory tutorial. Now you can play around and create as many templates as you want. You will gain expertise with each new template, and remeber there are endless possibilities to what you can do with the power of templates in Open Office. You can also download ready made Open Office templates from Tutorials For OpenOffice website.
Comment Summary
No comments available.


