FFmpeg is a popular command line utility, commonly used to convert media files from one format to another. However most home users are not very comfortable using command line tools. This is why there are many Graphical user interfaces available for FFmpeg. It is a cross platform application so it can be used on almost any modern operating system including Windows XP, Windows 7 and Windows Vista.
Though there are many FFmpeg Frontend GUI applications available for free to be used with Windows OS. But I will review two most easy to use and very powerful tools. WinFF and Avanti.
WinFF – FFmpeg based Free Video Converter
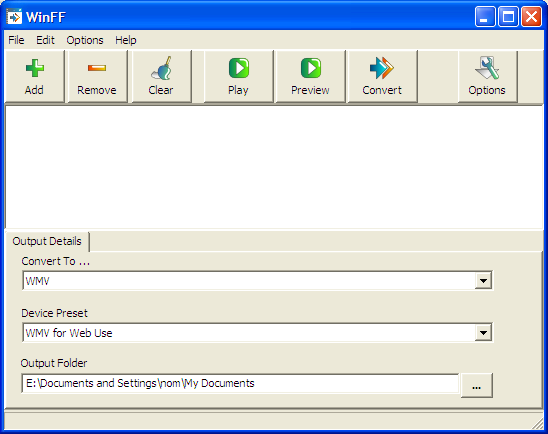
WinFF is probably the most easy to use video conversion utility I have ever used on Windows. It is basically a simple FFmpeg GUI with a very simple but intutive user interface.
Usage:
Pressing the Add button you can add a file you want to convert. Then in the Output details you select the format you want to convert this file to, device preset and destination folder. Device preset allows you to set quality parameters for the converted video, you can define where you want to use this converted file for example you can choose web, iphone, mobile, etc. Not all device presets are available for all formats. For example if you want to convert a file to WMV you can not use iphone as the device preset. Clicking on the option button opens the advanced interface where you can set the advanced settings for the conversion.
Support:
WinFF comes with documentation and support forums where you can go to get help if something goes wrong. It is also an open source application released under GNU public license which means you can freely redistribute and share it. It also comes in many languages.
Avanti – FFmpeg frontend for Windows
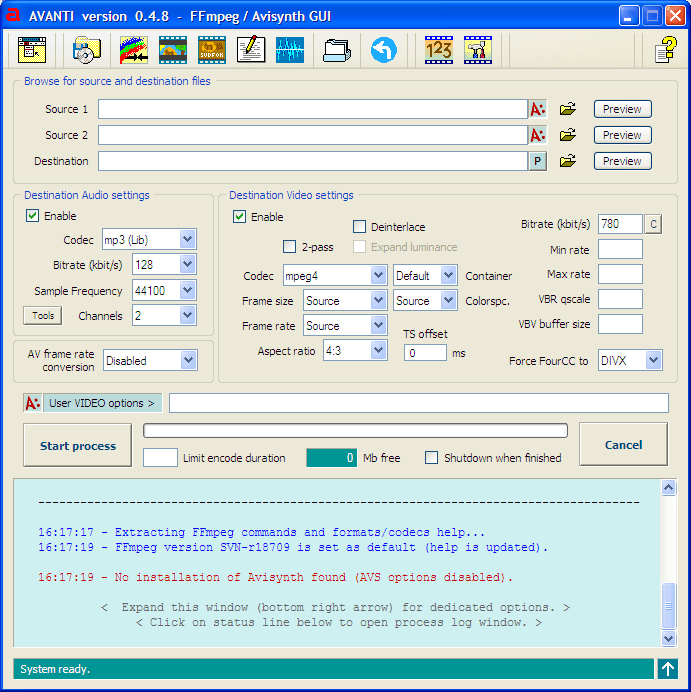
Avanti is an advanced Audio Video Conversion utility, with a Graphic User Interface for FFmpeg and with the option to insert Avisynth as pre-processor. It gives you more control over selecting the codecs and different parameters of conversion. It has many advanced options and more features than other FFmpeg front-ends. Avanti’s interface might look a little confusing, the installation is also a little complicated and you may not be able to understand few features. But still it is a very powerful tool to convert different media files using FFmpeg.
Avanti Installation:
Once you download the .7z file you will need to download 7-zip compression utility to uncompress the file you just downloaded. Uncompress it to its own folder and then open that folder, there you will see another folder ffmpeg. Since Avanti does not come with FFmpeg you will have to download FFmpeg separately and copy paste the FFmpeg.exe file to this folder. After that go back to main Avanti folder and double click on the file Avanti-Gui. This will open the Avanti interface.
Usage:
In the source file section you can select the file you want to convert. In the Destination Audio Settings and Destination Video Settings you can define how you want to convert this file and into what format and container. For example in the video settings you can select the codec Xvid and container avi. Then click on the Start Process button, if it does not work then you need to press the Start process button again. Avanti also comes with its own help file located in the installation folder. Also you can get more help from videohelp forum’s Avanti thread.
Converting multimedia files into different formats is something that every home user comes across at some point. So your friends and family would really appreciate if you share this post with them on Facebook or twitter.
Comment Summary
No comments available.